Aesthetic Adult Summer Crafts You'll Adore
Disclosure & Disclaimer: This post may contain affiliate links, which means I may earn a small commission at no extra cost to you if you choose to make a purchase. Some content on this site was created with the support of AI. All content is provided for inspirational purposes only and does not constitute professional, legal, or financial advice. Every activity shared here is meant to be fun and inspiring, but safety always comes first. Please supervise children closely and only choose activities that feel safe and appropriate for your environment and children's skill level.
Sun, Sand & Creativity: Easy Summer Crafts for a Beautiful Season
Summer is the perfect time to slow down, get a little messy, and make something beautiful. Whether you're looking for a relaxing creative outlet for yourself, a fun project to do with the kids, or a handmade gift that feels personal and special, craft season is officially open. The best summer crafts are the ones that bring the beach indoors — think ocean colors, natural textures, shells, and the warm glow of sunlight through glass. From beginner-friendly kits to satisfying step-by-step projects, everything in this guide is designed to be approachable, enjoyable, and genuinely gorgeous when finished. Grab your supplies, put on some music, and let's make something worth displaying all season long.
How to Make a Resin Wave Art Piece
- Don't Miss This Craft: Resin Wave Art Decor Kit !
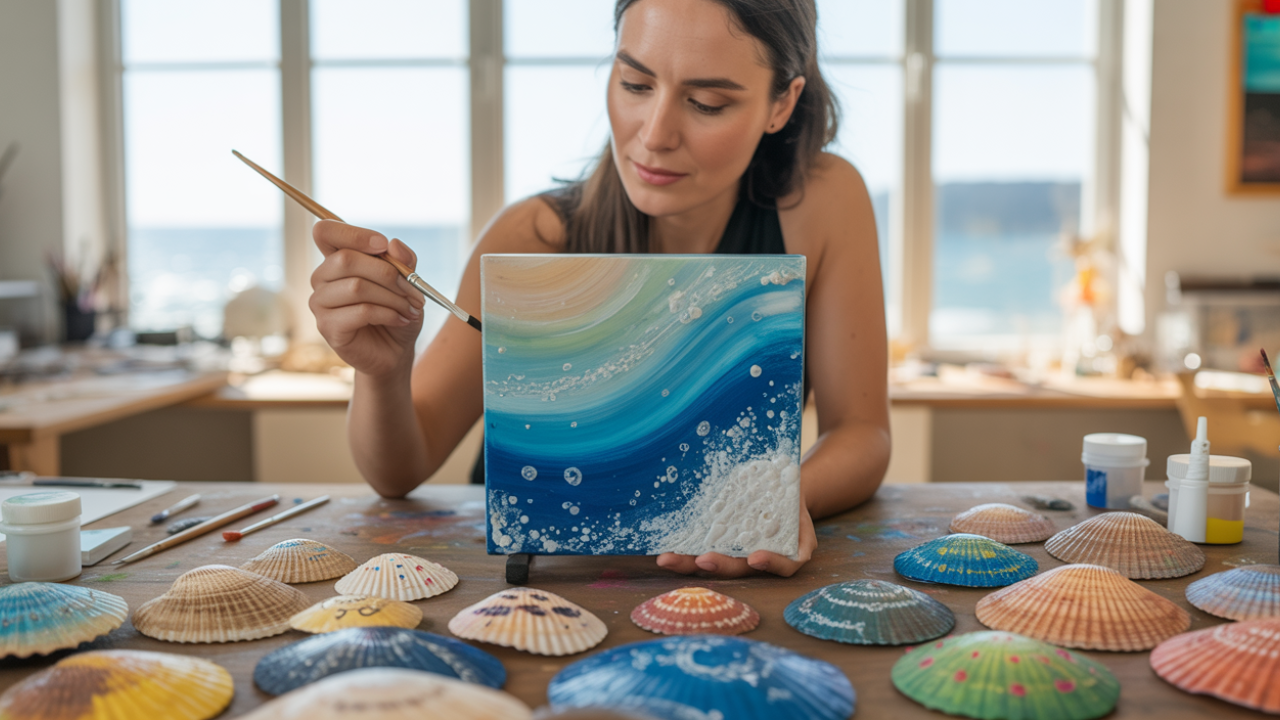
Resin wave art has taken the craft world by storm, and for good reason — the finished result looks like a slice of the actual ocean frozen in time, and the process of pouring and layering is deeply satisfying.
Suncatcher Kits: Beautiful, Easy, and Endlessly Rewarding
If you've never tried a suncatcher kit, this is your sign to pick one up this summer. Suncatcher kits come with everything you need — a clear resin or plastic frame in a fun shape, specially formulated transparent paints in jewel-toned colors, and a hanger so your finished piece is ready to display the moment it dries. The magic happens when you hang the finished suncatcher in a sunny window and watch it throw dancing spots of colored light across the walls and floor.
DIY Resin Coasters: A Summer Craft Worth Showing Off
Resin coasters are one of those projects that look incredibly impressive but are genuinely achievable for complete beginners — and once you've made one set, you'll want to make them for everyone you know. To make your own, you'll need a set of round or square silicone coaster molds (silicone is key, as the cured resin pops out cleanly), two-part epoxy resin, alcohol inks or pigment powders in your chosen color palette, and any embellishments you'd like to add such as dried flowers, gold leaf flakes, or small shells. Mix your resin according to the package instructions, pour a base layer into each mold, and then drop in your alcohol inks or pigments — just a small amount goes a long way. Use a toothpick or skewer to swirl the colors gently, then add any dried flowers or decorative elements and press them lightly into the surface. Hit any bubbles with a quick pass of a heat gun, then leave the molds to cure on a flat surface for 24 to 48 hours. Once fully cured, peel back the silicone mold to reveal your finished coasters. Add adhesive felt pads to the base so they won't scratch your table, and your handmade set is ready to use or gift.
Why Painted Seashells Are the Perfect Summer Craft
- Beautiful Blank Seashells to Paint
- Arylic Markers Make it Easy!
- Use an Acrylic Sealer to Protect Against Water
- Try a Shell Painting Kit!
Painted seashells are one of those timeless crafts that never go out of style — and once you start, it's almost impossible to stop at just one. Shells are nature's perfect little canvas: each one is unique in shape, texture, and size, which means no two finished pieces will ever look exactly alike. They require very little in the way of supplies (a few bottles of acrylic paint, some small brushes, and a handful of shells is truly all you need), and they work for every skill level from young children to experienced painters.
How to Paint Seashells: Step by Step
-
Gather your shells. Collect them from the beach or purchase a bag from a craft store. Give them a good wash with soap and warm water and allow them to dry completely — paint won't adhere well to damp or sandy surfaces.
-
Choose your paints. Acrylic craft paint works best on shells. It dries quickly, comes in a huge range of colors, and cleans up easily with water. Gather a selection of colors that speak to you — coastal whites, corals, navy, sage green, and gold are all beautiful choices.
-
Apply a base coat if desired. For a clean, solid background color, paint the entire outer surface of the shell with one base coat and let it dry fully before adding any design on top. This step is optional but makes colors appear more vibrant.
-
Paint your design. Use a fine-tip brush for detail work like stripes, dots, florals, or lettering. A medium brush works well for filling in larger areas of color. Try simple designs like a scallop pattern, a tiny sun, polka dots, a wave, or even a tiny succulent. There are no rules — follow what feels fun.
-
Add details and accents. Once your main design is dry, go back in with a fine brush and add any finishing details — a dot of gold in the center of a flower, thin white lines over a navy base to mimic the look of the shell's natural ridges, or a simple outlined pattern in a contrasting color.
-
Let everything dry completely. Acrylic paint dries quickly, but give your shells at least 30 minutes before handling them to avoid smearing any details you've just painted.
-
Seal with a top coat. Brush or spray a clear acrylic sealer or a coat of Mod Podge over the finished shell to protect the paint and add a beautiful shine. Gloss finish gives a polished, lacquered look; matte finish keeps things soft and natural. Allow the sealer to dry fully before displaying your shells.
How to Make a Clam Shell Trinket Dish: Step by Step
A painted and decorated clam shell makes the most charming little trinket dish — perfect for holding rings, earrings, small crystals, or a few pretty pebbles on a nightstand or vanity. Here's how to make one from start to finish.
-
Select a large clam shell. Look for a shell with a wide, flat interior — the bigger the better for a functional dish. Large clam shells are widely available at craft stores and online if you don't have one from a beach trip. Wash it thoroughly and allow it to dry completely.
-
Sand any rough edges. Use a piece of fine-grit sandpaper to gently smooth any sharp or jagged edges around the rim of the shell. This makes it safer to handle and gives it a more finished appearance.
-
Paint the exterior. Choose a base color for the outside of the shell and apply one or two coats of acrylic paint, allowing each coat to dry fully. Popular choices include matte white, soft sage green, dusty pink, navy, or a warm terracotta. The exterior color sets the overall tone of the dish.
-
Paint or line the interior. The inside of the shell is the showcase, so have fun here. You can paint it a contrasting or complementary color, apply gold or silver leaf for a luxurious look, or leave it natural if the shell has beautiful markings of its own. Gold leaf applied over a white base creates a stunning effect that looks far more expensive than it is.
-
Add decorative details. Use a fine brush and paint pen to add any decorative touches to the exterior — delicate floral sprigs, dots, stripes, a small monogram letter, or a simple wave pattern along the rim all look beautiful. Keep the design simple and let the natural shape of the shell do most of the visual work.
-
Apply a protective top coat. Once all paint and decorative elements are fully dry, seal the entire shell with a clear acrylic sealer. Apply it to the interior as well as the exterior for full protection. A gloss finish is particularly lovely on the inside of the dish as it gives it a slightly luminous, polished look.
-
Add felt pads to the base. Stick two or three small adhesive felt pads to the very bottom of the shell so it sits flat and won't scratch the surface of a nightstand or shelf. This small finishing touch makes all the difference.
-
Style and display. Place your finished trinket dish on a vanity, nightstand, bathroom shelf, or beside a candle on a coffee table. Fill it with rings, earrings, hair clips, or a few small crystals and enjoy the fact that something so beautiful came from a single shell and an afternoon of creativity.
Wishing You the Most Beautiful Summer
However you choose to spend your creative time this season, we hope it's filled with color, calm, and the quiet satisfaction that comes from making something with your own hands. Summer has a way of inviting us to slow down and pay attention to beautiful things — the way light moves through a suncatcher, the satisfying swirl of resin colors meeting for the first time, the perfect imperfection of a hand-painted shell. These crafts aren't just projects; they're little moments of joy you get to keep. Whether you try one idea from this list or work your way through all of them, we're cheering you on every step of the way.
Here's to a summer full of sunshine, creativity, and beautiful things made by you. Happy crafting!
Warmly,
Jenna
Get Profitable Online!
Clearly Entrepreneurially Elevated
Learn how to become profitable through blogs with affiliate links, videos with ads, memberships, coaching, and events.
All women deserve higher levels of love, health, wealth, and abundance. Follow your passions.
Freebies are Fun!
Join our amazing newsletter with fun tips, & receive the following feel good freebies:
- Opt In For Today's Freebie: "The #1 Reason Why People Purchase"
The number one reason people buy isn’t typically logic— This freebie reveals how to communicate your offers in a way that helps connect the dots. Move authentically towards more sales! Fulfill your mission.